This isn’t necessarily a post about the progress of my film PRAZINBURK RIDGE (read about how it came about here, about researching it here, and about challenges making it here, here and here), but it ties in - so, a quick update.
Ever since the earliest days of working on the film, I realised the scope was too much for me to handle alone and I applied for an Epic MegaGrant. My hope was my extensive film credits would be enough to land me some funding to help get the ambitious project finished. But, it wasn’t to be. The three-month period during which I expected a decision passed, and I was told to wait.
With no idea how long, and with more than three months of solid hard work invested in the project, I decided to cut a trailer, and then wait for a decision before doing anything else.
That decision eventually arrived fifteen months later, and it wasn’t good news.
For the last few months I’ve wondered what to do next with the project. There was still too much work to do to achieve even the standard of quality in the trailer, for almost ten minutes of its expected runtime. Many of the kitbashed assets I used were not up to the standard I’d like for the game-cinematic style of film I envisioned, all the characters are driven by ancient Mixamo rigs, and most of the mocap was done on my rickety old first-gen Noitom and has some real issues, and would need re-recording on decent gear to make look good. The shots in the trailer were all carefully chosen to not show Duggy’s face much, and to avoid rickety animation takes.
Crucially, I’d had positive comments on the visual style of the trailer. I hadn’t particularly intended to stylise it much but it was just all I could accomplish on my own. Photorealism is beyond me, I’d need help to achieve it. But, Duggy’s character design (he’s built out of the Brute from Mixamo) is quite stylised and so is the colour palette.
Recently, I had the idea that in order to be able to finish the film by myself, I’d need to lean into stylisation. It could help me cut corners. I figured I’d try a cel-shaded look, and drop my animation to 12fps. That would make mocap much easier to clean up, and I wouldn’t have to worry about replacing non-photoreal characters with new rigs that would require an entirely new pipeline. The goal here is to finish the film, not to remake it from the ground up!
I’m happy to say the setup and lookdev for this is going quite well and I’m almost ready to start rolling out shots. I’ll write about it in-depth another time. But I ran into a problem with Unreal post-processing effects that I thought was worth writing about now!
Duggy’s new look, on 2’s (to use some old animation terminology)
Here’s the long and short of it - if you’re using post-processing in UE4 (I can’t speak for UE5 but I understand it is the same) the software won’t output any alpha when rendering. In the Unreal documentation Epic have it listed as an unimplemented feature.
This was a disaster as I want to combine post-processes in comp to achieve the effect I’m looking for (I’m using a combination of cel-shading, toon lines and a separate painterly effect). In particular I want to be able to output my cel-shaded characters with an alpha - like a traditonal animation cel would be made on an acetate sheet and photographed on top of a painted background.
However! It is possible to force it to do it, and I’ll explain how here. It’s dead easy really but I couldn’t find mention of it online.
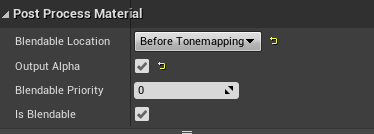
First, open up your material and scroll down in its properties to this section. You’ll want to activate the “Output Alpha” option box. This doesn’t do anything except open up the Opacity slot of your Post-Process material. You need to plug the right stuff in to get it to work.
The “right stuff”, specifically, is alpha channel data from the scene.

Take your PostProcessInput0 colour data, mask out the alpha with a ComponentMask node, then pipe into the Opacity slot of the Post Process material.
To get the data I need I’m using a combination of layers and/or duplicate Level Sequences with different combinations of actors. For example, if I have a fire in the foreground, it could either go on its own layer or it could go in a duplicate Level Sequence with the other actors either deleted, unspawned or invisible. Opening this up in a level that has no sky or fog will generate an alpha, as will a layer.
I hope this has been useful for anyone who might be struggling with this! Thanks for reading.